Docker
Docker is a set of platform as a service products that use OS-level virtualization to deliver software in packages called containers.
- Docker Compose
- Portainer 2.0 Update
- Install Snapdrop using Compose
- Install Droppy with Docker Compose
- Backup Docker Containers using Resilio Sync
- DashMachine 0.7 with Code Server
- Install Wordpress using Docker Compose
- Monica HQ
- OliveTin Linux Shell Web Interface
- Setup ShareX to work with Xbackbone from Windows
- Setup Vikunja using Docker Compose
- Setup and Install Kiwix Serve on Debian Systems
- Install Memo Notes via Docker Compose
- Install Polr Link Shortener with Docker Compose
- Docker Run
- Guacamole Remote Desktop Client
- Matomo
- Intall Watchtower with E-Mail (Gmail) Notifications
- Install Glances to Monitor Docker Containers (with web interface)
- Install AzuraCast
- Installing Docker
- Portainer
- Yacht
Docker Compose
The Compose file provides a way to document and configure all of the application's service dependencies (databases, queues, caches, web service APIs, etc). Using the Compose command line tool you can create and start one or more containers for each dependency with a single command.
Portainer 2.0 Update
Use this compose to update to Portainer 2.0
version: '2'

services:
  portainer:
    image: portainer/portainer-ce
    command: -H unix:///var/run/docker.sock
    restart: always
    ports:
      - 9001:9000
    volumes:
      - /var/run/docker.sock:/var/run/docker.sock
- portainer_data:/dataInstall Snapdrop using Compose
Use this compose stack to install Snapdrop. Change ports as needed. More information can be found here.
---
version: "2.1"
services:
  snapdrop:
    image: linuxserver/snapdrop
    container_name: snapdrop
    environment:
      - PUID=1000
      - PGID=1000
      - TZ=Europe/London
    ports:
      - 80:80
      - 443:443
    restart: unless-stopped
Install using Portainer
- Click on Stacks
- Give the stack a name
- Paste the compose script above into the stacks editor on Portainer
- Make any changes to ports (if necessary)
- Deploy

What is Snapdrop?
Install Droppy with Docker Compose
Droppy is a self-hosted file storage server with a web interface and capabilities to edit files and view media directly in the browser. It is particularly well-suited to be run on low-end hardware like the Raspberry Pi.

Features
- Responsive, scalable HTML5 interface
- Realtime updates of file system changes
- Directory and Multi-File upload
- Drag-and-Drop support
- Clipboard support to create image/text files
- Side-by-Side mode
- Simple and fast Search
- Shareable public download links
- Zip download of directories
- Powerful text editor with themes and broad language support
- Image and video gallery with touch support
- Audio player with seeking support
- Fullscreen support for editor and gallery
- Supports installing to the homescreen
- Docker images available for x86-64, ARMv6, ARMv7 and ARMv8
Install Droppy file manager using this compose stack. Change ports or volumes as needed. See the Droppy GitHub repo for more details.
version: '2'
services:
  droppy:
    container_name: droppy
    image: silverwind/droppy
    ports:
      - 8989:8989
    volumes:
      - /docker/Droppy:/config
      - /docker/Droppy/files:/files
restart: unless-stoppedBackup Docker Containers using Resilio Sync
Resilio Sync is a proprietary peer-to-peer file synchronization tool available for Windows, Mac, Linux, Android, iOS, Windows Phone, Amazon Kindle Fire and BSD.
Resilio Sync can be used to copy your docker container files from one machine to another either locally or anywhere in the world. You will need to install Resilio Sync on both machines. My Docker host is on a VM and the backups are sent to my Synology NAS which also runs Resilio Sync. For Synology users, Resilio Sync can be installed as a Package or as a Docker container. I prefer the Docker container but both will work. For the Docker host machine I only use... well, the docker container of-course.
One thing to note is Resilio Sync is NOT a backup tool but a syncing tool. Whatever your host machine pulls in, your backup machine will too. Keep that in mind when it comes to downloading files that you have no idea might contain threats to your system.
Install Resilio Sync
Install the LinuxServer Resilio Sync Docker container on your Docker host. I use this compose file.
---
version: "2.1"
services:
  resilio-sync:
    image: linuxserver/resilio-sync
    container_name: resilio-sync
    environment:
      - PUID=1000
      - PGID=1000
      - TZ=Europe/London
      - UMASK_SET=022
    volumes:
      - path to config:/config
      - path to downloads:/downloads
      - /:/sync
    ports:
      - 8888:8888
      - 55555:55555
    restart: unless-stopped
I prefer Compose because I use Portainer and Yacht to control my stacks.
Make changes to the ports, IDs and volumes as needed. Notice I bind "/" to"/sync", this allows you to browse your whole machine for folders to sync.
Repeat the same process on your Docker Backup machine.
Setup Resilio Sync
When you first load the UI you will be prompted to setup a username and password. Then assign a machine name. This name will be used so you can identify which machine is syncing to the folders you share. It's good if you have multiple machines syncing files.
Now on your Docker host Resilio Sync instance, you need to add a folder to share out. This should be the folder where you store your Docker container/s.
Click the plus in the upper left and add a standard folder.
My container files happen to be in my root directory. This is where my Wordpress files are stored for my Wordpress container.
Select the folder then click open. You will get a prompt to share your folder. Close that because we are not ready to do that yet.
I created a new folder called Family Portal and that is where I want the files from my Docker host to go to. Now it's time to sync the filse from your host to your backup machine.
Go back to your Docker host Resilio Sync instance and right click om the folder you just setup and click the share option.
This will give you some different ways to sync your files to the backup machine.
I like to do "read only" syncing because this will make it so the backup machine cannot delete files from the host machine. So if you accidentally delete the files on your backup machine it wont delete them on the host machine too! Once you've made that mistake it only takes one time before you use read only lol.
Click on Key and copy the Read Only link then go back to your backup machine instance of Resilio Sync.
Click on the plus icon in the upper left corner again and this time click on Enter a key or link.
A new window will pop up where you enter the key and press ok. Then you need to browse for the folder you made on your backup machine to sync the files. I made the Family Portal folder so that's the folder I chose. Then click open.
Your files should now begin downloading to the backup machine and will do so every time a new file is added or changed.
Resilio Sync is very low maintenance. It's pretty much set it and forget it. However, it's always good to peek in and make sure your connections are still working from time to time.
DashMachine 0.7 with Code Server
---
version: "2.1"
services:
  dashmachine:
    image: rmountjoy/dashmachine0.7:latest
    container_name: dashmachine
    environment:
      - PUID=1000
      - PGID=1000
      - TZ=America/Detroit
      - EDITOR_URL=https://your-reverse-proxy.url
    volumes:
      - /config/directory:/DashMachine/config
    ports:
      - 5000:5000
    restart: unless-stopped
  code-server:
    image: linuxserver/code-server:latest
    container_name: code-server
    environment:
      - PUID=1000
      - PGID=1000
      - TZ=America/Detroit
      - PASSWORD=mysecretpassword
      - SUDO_PASSWORD=mysecretpassword
      - PROXY_DOMAIN=your-reverse-proxy.url
    volumes:
      - /config/directory:/config
      - /config/directory/workspace:/config/workspace/Dashmachine
    ports:
      - 8443:8443
restart: unless-stoppedInstall Wordpress using Docker Compose
This stack can be used to install Wordpress with a MySQL DB. Change the ports and volume binds as you need.
version: '2'

services:
   db:
     image: mysql:5.7
     volumes:
       - /docker/wordpress/db:/var/lib/mysql
     restart: always
     environment:
       MYSQL_ROOT_PASSWORD: wordpress
       MYSQL_DATABASE: wordpress
       MYSQL_USER: wordpress
       MYSQL_PASSWORD: wordpress

   wordpress:
     image: wordpress:latest
     ports:
       - 8977:80
     restart: always
     environment:
       WORDPRESS_DB_HOST: db:3306
       WORDPRESS_DB_USER: wordpress
       WORDPRESS_DB_PASSWORD: wordpress
     volumes:
- /docker/wordpress:/var/www/htmlMonica HQ
This version will use the apache image and add a mysql container. The volumes are set to keep your data persistent. This setup provides no ssl encryption and is intended to run behind a proxy.
Make sure to pass in values for APP_KEY variable before you run this setup.
Set APP_KEY to a random 32-character string. You can for instance copy and paste the output of echo -n 'base64:'; openssl rand -base64 32.
- Create a
docker-compose.ymlfile
version: "3.4"

services:
  app:
    image: monica
    depends_on:
      - db
    ports:
      - 8080:80
    environment:
      - APP_KEY=
      - DB_HOST=db
      - DB_USERNAME=usermonica
      - DB_PASSWORD=secret
    volumes:
      - data:/var/www/html/storage
    restart: always

  db:
    image: mysql:5.7
    environment:
      - MYSQL_RANDOM_ROOT_PASSWORD=true
      - MYSQL_DATABASE=monica
      - MYSQL_USER=usermonica
      - MYSQL_PASSWORD=secret
    volumes:
      - mysql:/var/lib/mysql
    restart: always

volumes:
  data:
    name: data
  mysql:
    name: mysql
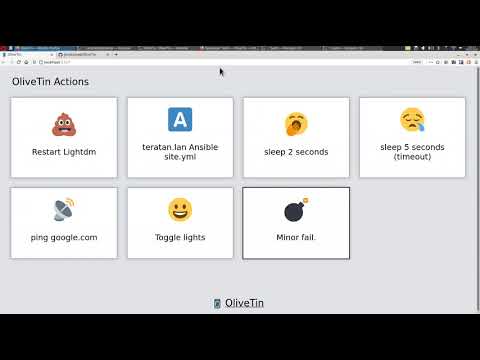
OliveTin Linux Shell Web Interface
OliveTin

OliveTin is a web interface for running Linux shell commands.

Some example use cases;
- Give controlled access to run shell commands to less technical folks who cannot be trusted with SSH. I use this so my family can
podman restart plexwithout asking me, and without giving them shell access! - Great for home automation tablets stuck on walls around your house - I use this to turn Hue lights on and off for example.
- Sometimes SSH access isn't possible to a server, or you are feeling too lazy to type a long command you run regularly! I use this to send Wake on Lan commands to servers around my house.
Join the community on Discord.
YouTube video demo (6 mins)
Features
- Responsive, touch-friendly UI - great for tablets and mobile
- Super simple config in YAML - because if it's not YAML now-a-days, it's not "cloud native" :-)
- Dark mode - for those of you that roll that way.
- Accessible - passes all the accessibility checks in Firefox, and issues with accessibility are taken seriously.
- Container - available for quickly testing and getting it up and running, great for the selfhosted community.
- Integrate with anything - OliveTin just runs Linux shell commands, so theoretially you could integrate with a bunch of stuff just by using curl, ping, etc. However, writing your own shell scripts is a great way to extend OliveTin.
- Lightweight on resources - uses only a few MB of RAM and barely any CPU. Written in Go, with a web interface written as a modern, responsive, Single Page App that uses the REST/gRPC API.
- Good amount of unit tests and style checks - helps potential contributors be consistent, and helps with maintainability.
Screenshots
Desktop web browser;

Desktop web browser (dark mode);

Mobile screen size (responsive layout);

Documentation
All documentation can be found at http://docs.olivetin.app . This includes installation and usage guide, etc.
Quickstart reference for config.yaml
This is a quick example of config.yaml - but again, lots of documentation for how to write your config.yaml can be found at the documentation site.
Put this config.yaml in /etc/OliveTin/ if you're running a standard service, or mount it at /config if running in a container.
# Listen on all addresses available, port 1337
listenAddressSingleHTTPFrontend: 0.0.0.0:1337

# Choose from INFO (default), WARN and DEBUG
logLevel: "INFO"

# Actions (buttons) to show up on the WebUI:
actions:
  # Docs: https://docs.olivetin.app/action-container-control.html
- title: Restart Plex
  icon: smile
  shell: docker restart plex

  # This will send 1 ping
  # Docs: https://docs.olivetin.app/action-ping.html
- title: Ping Google.com
  shell: ping google.com -c 1

  # Restart lightdm on host "overseer"
  # Docs: https://docs.olivetin.app/action-ssh.html
- title: restart lightdm
  icon: poop
  shell: ssh root@overseer 'service lightdm restart'
A full example config can be found at in this repository - config.yaml.
Setup ShareX to work with Xbackbone from Windows
XBackBone is a simple, self-hosted, lightweight PHP file manager that support the instant sharing tool ShareX and *NIX systems. It supports uploading and displaying images, GIF, video, code, formatted text, and file downloading and uploading. Also have a web UI with multi user management, past uploads history and search support.

Install Xbackbone server using this Docker Compose snippet.
version: "2.1"
services:
  xbackbone:
    image: ghcr.io/linuxserver/xbackbone
    container_name: xbackbone
    environment:
      - PUID=1000
      - PGID=1000
      - TZ=America/Detroit
    volumes:
      - /docker/xbackbone:/config
    ports:
      - 8087:80
      - 4443:443
    restart: unless-stopped
Now download the Sharex client config by clicking the button shown here


Now it's time to import that file you downloaded from your Xbackbone profile.

Then under Image uploader (2) select your domain or server IP. Click the test button to make sure it works, then close it out.
Extra
You can enable the ability to right click on images from websites or your desktop to upload to your server.

Now enjoy your self hosted Xbackbone host!

Setup Vikunja using Docker Compose

Vikunja is an Open-Source, self-hosted To-Do list application for all platforms. It is licensed under the GPLv3.
Test out Vikunja demo here.
This guide is assuming you are installing Vikunja on a fresh Debian based OS such as Ubuntu, Debian or Turnkey Core. You can edit the docker-compose.yml to change the port and database passwords however, it is not required unless port 80 is being used by another service. Do NOT modify or change anything in the nginx.conf file even if you change the port in the docker-compose.yml file.
- Install docker - apt install docker.io -y
- Install docker compose - apt install docker-compose -y
- cd /
- mkdir docker
- cd docker
- mkdir vikunja
- cd /docker/vikunja
- create docker-compose.yml - touch docker-compose.yml
- nano docker-compose.yml - copy the content below into the file then press crtl x then y then enter.
- create nginx.conf - touch nginx.conf - If that creates a directory, remove it rm d nginx.conf then use cat > nginx.conf
- nano nginx.conf - copy the content from the below example into the file then press ctrl x then y then enter on your keyboard.
- run docker-compose up -d
When the install finishes you should see these files and folders in /docker/vikunja directory.

Find the ip by typing the following into the terminal:
ip addrVikunja Docker Compose without Email Notifications
version: '3'

services:
  db:
    image: mariadb:10
    command: --character-set-server=utf8mb4 --collation-server=utf8mb4_unicode_ci
    environment:
      MYSQL_ROOT_PASSWORD: supersecret
      MYSQL_USER: vikunja
      MYSQL_PASSWORD: secret
      MYSQL_DATABASE: vikunja
    volumes:
      - ./db:/var/lib/mysql
    restart: unless-stopped
  api:
    image: vikunja/api
    environment:
      VIKUNJA_DATABASE_HOST: db
      VIKUNJA_DATABASE_PASSWORD: secret
      VIKUNJA_DATABASE_TYPE: mysql
      VIKUNJA_DATABASE_USER: vikunja
      VIKUNJA_DATABASE_DATABASE: vikunja
    volumes:
      - ./files:/app/vikunja/files
    depends_on:
      - db
    restart: unless-stopped
  frontend:
    image: vikunja/frontend
    restart: unless-stopped
  proxy:
    image: nginx
    ports:
      - 8022:80
    volumes:
      - ./nginx.conf:/etc/nginx/conf.d/default.conf:ro
    depends_on:
      - api
      - frontend
    restart: unless-stopped
Vikunja Nginx.conf file
server {
    listen 80;

    location / {
        proxy_pass http://frontend:80;
    }

    location ~* ^/(api|dav|\.well-known)/ {
        proxy_pass http://api:3456;
        client_max_body_size 20M;
    }
}
Vikunja Docker Compose With Email Notifications
The following docker compose is using Google SMTP servers to send email notifications. Edit the SMTP settings in the stack below to suit your needs.
version: '3'

services:
  db:
    image: mariadb:10
    command: --character-set-server=utf8mb4 --collation-server=utf8mb4_unicode_ci
    environment:
      MYSQL_ROOT_PASSWORD: supersecret
      MYSQL_USER: vikunja
      MYSQL_PASSWORD: secret
      MYSQL_DATABASE: vikunja
    volumes:
      - ./db:/var/lib/mysql
    restart: unless-stopped
  api:
    image: vikunja/api
    environment:
      VIKUNJA_DATABASE_HOST: db
      VIKUNJA_DATABASE_PASSWORD: secret
      VIKUNJA_DATABASE_TYPE: mysql
      VIKUNJA_DATABASE_USER: vikunja
      VIKUNJA_DATABASE_DATABASE: vikunja
      VIKUNJA_SERVICE_FRONTENDURL: https://your-frontend-url.com/
      VIKUNJA_SERVICE_ENABLETASKATTACHMENTS: 1
      VIKUNJA_SERVICE_ENABLEREGISTRATION: 0
      VIKUNJA_SERVICE_ENABLEEMAILREMINDERS: 1
      VIKUNJA_MAILER_ENABLED: 1
      VIKUNJA_MAILER_FORCESSL: 1
      VIKUNJA_MAILER_HOST: smtp.gmail.com
      VIKUNJA_MAILER_PORT: 465
      VIKUNJA_MAILER_USERNAME: youremail@gmail.com
      VIKUNJA_MAILER_PASSWORD: yourgmailpassword
    volumes:
      - ./files:/app/vikunja/files
    depends_on:
      - db
    restart: unless-stopped
  frontend:
    image: vikunja/frontend
    restart: unless-stopped
  proxy:
    image: nginx
    ports:
      - 8022:80
    volumes:
      - ./nginx.conf:/etc/nginx/conf.d/default.conf:ro
    depends_on:
      - api
      - frontend
    restart: unless-stopped
Video Tutorials
Setup and Install Kiwix Serve on Debian Systems
Kiwix Serve is a .zim compatible web server: it allows you to deliver .zim files over the HTTP protocol within your local network – be it a University or your own house. Simply start Kiwix-Serve on your machine, and your content will be available for anybody through their web browser.

Kiwix is an offline reader – meaning that it allows you to browse text or video that is normally only available on the internet. We turn various online contents (such as Wikipedia, for example) into ZIM files, and these can be opened by Kiwix even if you have no connectivity.
Our technology’s main advantage is its high compression rate. For instance, the entirety of Wikipedia (more than 6 million articles, with images) can fit in 80Gb. The Gutenberg Library’s 60,000 books will fit on 60 Gb of storage space.
Docker Compose Stack
Change the volume location to that of your own and add the correct zim file names that are in that directory to the stack.
version: '3'
services:
  kiwix-serve:
    image: kiwix/kiwix-serve
    volumes:
      - /docker/kiwixserve:/data
    ports:
      - '8080:80'
    command:
      wikipedia_en_top_maxi_2021-08.zim
It is advised to just use the run command and use an asterisk so you don't have to add or change the zim filenames in the compose stack above. It's just easier to use.
docker run -v /docker/kiwixserve:/data -p 8080:80 kiwix/kiwix-serve *.zimKiwix Files I Host
All of the Kiwix zim files I host with detailed information
| File Name | Download Link | Size |
| wikipedia_en_all_maxi_2021-03.zim | https://download.kiwix.org/zim/wikipedia/wikipedia_en_all_maxi_2021-03.zim | 82G |
| askubuntu.com_en_all_2021-05.zim | https://download.kiwix.org/zim/stack_exchange/askubuntu.com_en_all_2021-05.zim | 8.1G |
| gardening.stackexchange.com_en_all_2021-05.zim | https://download.kiwix.org/zim/stack_exchange/gardening.stackexchange.com_en_all_2021-05.zim | 938M |
| gutenberg_en_all_2021-10.zim | https://download.kiwix.org/zim/gutenberg/gutenberg_en_all_2021-10.zim | 64G |
| crashcourse_en_all_2021-09.zim | https://download.kiwix.org/zim/other/crashcourse_en_all_2021-09.zim | 39G |
| wikibooks_en_all_maxi_2021-03.zim | https://download.kiwix.org/zim/wikibooks/wikibooks_en_all_maxi_2021-03.zim | 4.3G |
| wiktionary_en_all_maxi_2021-09.zim | https://download.kiwix.org/zim/wiktionary/wiktionary_en_all_maxi_2021-09.zim | 6G |
| superuser.com_en_all_2020-10.zim | https://download.kiwix.org/zim/stack_exchange/superuser.com_en_all_2020-10.zim | 8.5G |
| wikisource_en_all_maxi_2021-03.zim | https://download.kiwix.org/zim/wikisource/wikisource_en_all_maxi_2021-03.zim | 14G |
| ted_en_technology_2021-10.zim | https://download.kiwix.org/zim/ted/ted_en_technology_2021-10.zim | 45G |
| wikistage_multi_all_2021-09.zim | https://download.kiwix.org/zim/other/wikistage_multi_all_2021-09.zim | 21G |
| wikivoyage_en_all_maxi_2021-10.zim | https://download.kiwix.org/zim/wikivoyage/wikivoyage_en_all_maxi_2021-10.zim | 658M |
| wikinews_en_all_maxi_2021-08.zim | https://download.kiwix.org/zim/wikinews/wikinews_en_all_maxi_2021-08.zim | 231M |
| wikispecies_en_all_maxi_2021-08.zim | https://download.kiwix.org/zim/other/wikispecies_en_all_maxi_2021-08.zim | 2.2G |
| wikiversity_en_all_maxi_2021-03.zim | https://download.kiwix.org/zim/wikiversity/wikiversity_en_all_maxi_2021-03.zim | 2.3G |
Find and download .zim files here https://download.kiwix.org/zim/
What do mini, nopic and maxi mean in the Wikipedia zim files?
File size is always an issue when downloading such big content, so Kiwix produces each Wikipedia file in three flavours:
- Mini: only the introduction of each article, plus the infobox. Saves about 95% of space vs. the full version.
- nopic: full articles, but no images. About 75% smaller than the full version
- Maxi: the default full version.
- CD into your mapped data directory for the Docker container to download the zim files using wget.
- Add the name of each zim file to your stack.
- Start or deploy the docker stack and enjoy!
There is also a desktop app for both Windows and Linux called Kiwix JS Electron.
Pause wget Download
If you find yourself in a situtation where you’re downloading a large file and need to shutdown your computer during the download for whatever reason, no problem, you can pause the download.
In the terminal window that is downloading your file just enter the following keyboard shortcut.
Ctrl + cThis will stop the download and then you can shutdown your computer if you need. To resume the download, read on.
Resume wget Download
To resume a wget download it’s very straight forward. Open the terminal to the directory where you were downloading your file to and run wget with the -c flag to resume the download.
wget -c https://example.com/filename.zipInstall Memo Notes via Docker Compose
Use this guide to setup and install Meemo with Docker Compose. See our review of Meemo.
Setup
-
Ensure Docker and Docker-Compose are installed
-
On your host machine, create the following files and directories inside a directory of your choice.
# users file
touch users.json
# data and database directory
mkdir data database
# set ownership to map container user ID 1000
chown 1000 users.json data database
# set permissions
chmod 600 users.json
chmod 700 data database
-
Download docker-compose.yml on your host inside the same directory then modify it as you wish:
wget https://raw.githubusercontent.com/qdm12/meemo/master/docker-compose.yml
-
Launch the MongoDB database and Meemo container with
docker-compose up -d
-
You can check logs with
docker-compose logs -f
-
Meemo is at localhost:3000 (depending on your mapped port in docker-compose.yml)
Configuration
We assume your Meemo container is named meemo in the following.
# List users
docker exec meemo ./meemo/admin users

# Add a user
docker exec meemo ./meemo/admin user-add -u yourUser -p yourPassword --display-name yourUser

# Edit a user
docker exec meemo ./meemo/admin user-edit -u yourUser -p yourPassword --display-name yourUser

# Remove a user
docker exec meemo ./meemo/admin user-del -u yourUser
All the changes are saved to users.json
To support the Meemo project or follow developement, please visit the Meemo Github repo.
Install Polr Link Shortener with Docker Compose
Polr is a quick, modern, and open-source link shortener. It allows you to host your own URL shortener, to brand your URLs, and to gain control over your data. Visit the Polar website.

If MySQL is not already setup, run this stack to install it for Polr to connect to a DB.
version: '3'

services:
  db:
    image: mysql:5.7
    container_name: db
    environment:
      MYSQL_ROOT_PASSWORD: supersecretdbpass0rd
      MYSQL_DATABASE: polr
      MYSQL_USER: root
      MYSQL_PASSWORD: supersecretdbpass0rd
    ports:
      - "3306:3306"
    volumes:
      - /docker/mysql:/var/lib/mysql
  phpmyadmin:
    image: phpmyadmin/phpmyadmin
    container_name: pma
    links:
      - db
    environment:
      PMA_HOST: db
      PMA_PORT: 3306
      PMA_ARBITRARY: 1
    restart: always
    ports:
      - 8099:80
volumes:
  dbdata:
Use this docker stack.
version: '3.3'
services:
    polr:
        ports:
            - '8080:8080'
        environment:
            - DB_HOST=192.168.1.100:3306 #your docker host IP
            - DB_DATABASE=polr
            - DB_USERNAME=root
            - DB_PASSWORD=supersecretdbpass0rd
            - APP_ADDRESS=yourdomainhere.com
            - ADMIN_USERNAME=admin
            - ADMIN_PASSWORD=admin
            - SETTING_ADV_ANALYTICs=true
        image: ajanvier/polr
Visit your Polr app at yourdomain.com
Docker Run
Docker runs processes in isolated containers. A container is a process which runs on a host. The host may be local or remote. When an operator executes docker run, the container process that runs is isolated in that it has its own file system, its own networking, and its own isolated process tree separate from the host.
Guacamole Remote Desktop Client
Use this command to install Guacamole Remote Desktop Client. Change the port and volume bind location if needed.
docker run \
  -p 8080:8080 \
  -v /guacamole:/config \
oznu/guacamoleMatomo
Take back control with Matomo – a powerful web analytics platform that gives you 100% data ownership.
Matomo is used to gather analytics on The Homelab Wiki
See the official GitHub repo for more information.
Use the following command to install Matomo. Change the port and volume as needed.
docker run -d -p 8000:8000 --name matomo \
  -v /home/usr/matomo/data:/data \
  crazymax/matomo:latest
Intall Watchtower with E-Mail (Gmail) Notifications
Use the following code to install watchtower with gmail notifications. See more information and documentation here.
sudo docker run -d \
  --name watchtower \
  -v /var/run/docker.sock:/var/run/docker.sock \
  -e WATCHTOWER_NOTIFICATIONS=email \
  -e WATCHTOWER_NOTIFICATION_EMAIL_FROM=youremail@gmail.com \
  -e WATCHTOWER_NOTIFICATION_EMAIL_TO=youremail@gmail.com \
  -e WATCHTOWER_NOTIFICATION_EMAIL_SERVER=smtp.gmail.com \
  -e WATCHTOWER_NOTIFICATION_EMAIL_SERVER_USER=youremail@gmail.com \
  -e WATCHTOWER_NOTIFICATION_EMAIL_SERVER_PASSWORD=your-email-password \
  -e WATCHTOWER_NOTIFICATION_EMAIL_DELAY=2 \
  containrrr/watchtower
Without email notifications
sudo docker run -d \
    --name watchtower \
    -v /var/run/docker.sock:/var/run/docker.sock \
containrrr/watchtowerInstall Glances to Monitor Docker Containers (with web interface)
Glances can be installed through Docker, allowing you to run it without installing all the python dependencies directly on your system. Once you have Docker installed you can run the following command to install Glances with a web interface. See more information here.
sudo docker run -d --restart="always" -p 61208-61209:61208-61209 -e GLANCES_OPT="-w" -v /var/run/docker.sock:/var/run/docker.sock:ro --pid host docker.io/nicolargo/glances
Install AzuraCast
Use these commands to install AzuraCast on your host machine. This will install Docker in the process.

sudo suapt-get upgradeapt-get updatemkdir -p /var/azuracastcd /var/azuracastcurl -fsSL https://raw.githubusercontent.com/AzuraCast/AzuraCast/main/docker.sh docker.shchmod a+x docker.sh./docker.sh installInstalling Docker
Different ways to install Docker on your preferred Operating System.
Installing Docker on Ubuntu
Installing Docker on Ubuntu is simple. Run the following commands separately.
sudo apt install docker.io
sudo systemctl enable docker
sudo systemctl start docker
sudo systemctl status docker
This will ensure docker will run when you restart your system or server.
Installing Docker and Portainer to use With the Edge Agent
Use the following commands to setup Docker and Portainer to be used with the Edge Agent. This will allow you to connect all of your docker hosts to one Portainer host.
First install Docker
sudo apt install docker.io
sudo systemctl enable docker
sudo systemctl start docker
sudo systemctl status docker
Now install Portainer with both ports 9000 and 8000. The Edge Agent uses port 8000 so this is a must.
docker run -d \
--name="portainer" \
--restart on-failure \
-p 9000:9000 \
-p 8000:8000 \
-v /var/run/docker.sock:/var/run/docker.sock \
-v portainer_data:/data \
portainer/portainer-ce:latest
Refer to this video for connecting Docker hosts to Portainer.
Refer to this video for connecting Synology Docker endpoints to Portainer using the Edge Agent.
Portainer
Portainer is a universal container management tool that helps users deploy and manage container-based applications without needing to know how to write any platform-specific code.
Portainer Edge Agent
Assuming you have Docker installed on your Synology NAS, you may run the Edge Agent to connect it to Portainer on another host!
For Synolgy NAS you have to change the volume. See below.
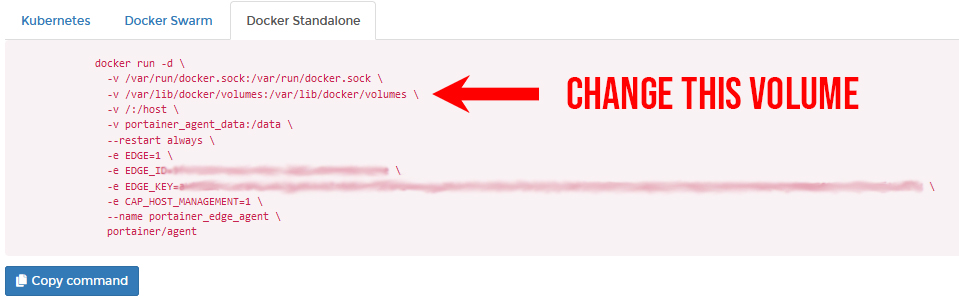
On line three of the command you have to change the volume to match that of Synology.
-v /var/lib/docker/volumes:/var/lib/docker/volumes \
Change that line to
-v /volume1/@docker/volumes:/var/lib/docker/volumes \Then run the command and viola! You can now connect to your Synology NAS through portainer using the Edge Agent!
Do not run the below command. You have to get it from your Portainer dahboard!
The command will look similar to this.
docker run -d \
-v /var/run/docker.sock:/var/run/docker.sock \
-v /volume1/@docker/volumes:/var/lib/docker/volumes \
-v /:/host \
-v portainer_agent_data:/data \
--restart always \
-e EDGE=1 \
-e EDGE_ID=YOURSECRETID \
-e EDGE_KEY=YOURSECRETKEY \
-e CAP_HOST_MANAGEMENT=1 \
--name portainer_edge_agent \
portainer/agent
See the video instructions below.
Portainer Git
https://github.com/portainer/portainer
![]()


![]()
Portainer is a lightweight management UI which allows you to easily manage your different Docker environments (Docker hosts or Swarm clusters). Portainer is meant to be as simple to deploy as it is to use. It consists of a single container that can run on any Docker engine (can be deployed as Linux container or a Windows native container, supports other platforms too). Portainer allows you to manage all your Docker resources (containers, images, volumes, networks and more!) It is compatible with the standalone Docker engine and with Docker Swarm mode.
Demo
You can try out the public demo instance: http://demo.portainer.io/ (login with the username admin and the password tryportainer).
Please note that the public demo cluster is reset every 15min.
Alternatively, you can deploy a copy of the demo stack inside a play-with-docker (PWD) playground:
- Browse PWD/?stack=portainer-demo/play-with-docker/docker-stack.yml
- Sign in with your Docker ID
- Follow these steps.
Unlike the public demo, the playground sessions are deleted after 4 hours. Apart from that, all the settings are the same, including default credentials.
Getting started
Getting help
For FORMAL Support, please purchase a support subscription from here: https://www.portainer.io/products/portainer-business
For community support: You can find more information about Portainer's community support framework policy here: https://www.portainer.io/products/community-edition/customer-success
- Issues: https://github.com/portainer/portainer/issues
- FAQ: https://documentation.portainer.io
- Slack (chat): https://portainer.io/slack/
Reporting bugs and contributing
- Want to report a bug or request a feature? Please open an issue.
- Want to help us build portainer? Follow our contribution guidelines to build it locally and make a pull request. We need all the help we can get!
Security
- Here at Portainer, we believe in responsible disclosure of security issues. If you have found a security issue, please report it to security@portainer.io.
Privacy
To make sure we focus our development effort in the right places we need to know which features get used most often. To give us this information we use Matomo Analytics, which is hosted in Germany and is fully GDPR compliant.
When Portainer first starts, you are given the option to DISABLE analytics. If you don't choose to disable it, we collect anonymous usage as per our privacy policy. Please note, there is no personally identifiable information sent or stored at any time and we only use the data to help us improve Portainer.
Limitations
Portainer supports "Current - 2 docker versions only. Prior versions may operate, however these are not supported.
Licensing
Portainer is licensed under the zlib license. See LICENSE for reference.
Portainer also contains code from open source projects. See ATTRIBUTIONS.md for a list.
Activate Portainer Dark Mode
Portainer has had dark mode since version 2.9.0! Here's how to activate it!

Step 1
Click on "my account" in the upper right.
Step 2
Click Dark Theme

Step 3
Click Update Theme
Did you find this helpful? Subscribe to me on Youtube for more content!
Install Portainer Agent
Use this docker command to install the Portainer Agent on the remote machine.
docker run -d -p 9001:9001 --name portainer_agent --restart=always -v /var/run/docker.sock:/var/run/docker.sock -v /var/lib/docker/volumes:/var/lib/docker/volumes portainer/agentYacht
A web interface for managing docker containers with an emphasis on templating to provide 1 click deployments. Think of it like a decentralized app store for servers that anyone can make packages for.
Yacht Git
https://github.com/SelfhostedPro/Yacht
![]()

Yacht
Yacht is a container management UI with a focus on templates and 1-click deployments.
If the built in update button isn't working for you try the following command:
docker run --rm -d -v /var/run/docker.sock:/var/run/docker.sock containrrr/watchtower:latest --cleanup --run-once <container-name>
Demo:

Installation:
Currently only linux has been verified as working but we are open to the idea of supporting windows eventually as well.
Keep in mind, this is an alpha so the risk of data loss is real and it may not be stable
Installation documentation can be found here.
Check out the getting started guide if this is the first time you've used Yacht: https://yacht.sh/docs/Installation/Getting_Started
Yacht is also available via the DigitalOcean marketplace:

We can also be found on Linode
![]()
Features So Far:
- Vuetify UI Framework
- Basic Container Management
- Template Framework
- Easy Template Updating
- Centralized settings for volume management and similar QOL functionality.
- Docker-Compose Compatibility
- Advanced Container Management (Edit/Modify)
Planned Features:
- Container Monitoring
- Easy access to container interfaces
- User Management
- Scheduled Jobs
If you want something that's not planned please open a feature request issue and we'll see about getting it added.
Templating:
Currently Yacht is compatible with portainer templates. You'll add a template url in the "Add Template" settings. The the template will be read, separated into apps, and imported into the database. The apps associated with the templates are linked via a db relationship so when the template is removed, so are the apps associated with it. We store the template url as well so we can enable updating templates with a button press.
We recommend starting with:
https://raw.githubusercontent.com/SelfhostedPro/selfhosted_templates/yacht/Template/template.json
In templates you are able to define variables (starting with !) to have them automatically replaced by whatever variable the user has set in their server settings (ie. !config will be replaced by /yacht/AppData/Config by default).
Notes for ARM devices
If you're on arm and graphs aren't showing up add the following to your cmdline.txt:
cgroup_enable=cpuset cgroup_enable=memory cgroup_memory=1
Supported Environment Variables
You can utilize the following environment variables in Yacht. None of them are manditory.
| Variable | Description |
|---|---|
| PUID | Set userid that the container will run as. |
| PGID | Set groupid that the container will run as. |
| SECRET_KEY | Setting this to a random string ensures you won't be logged out in between reboots of Yacht. |
| ADMIN_EMAIL | This sets the email for the default Yacht user. |
| DISABLE_AUTH | This disables authentication on the backend of Yacht. It's not recommended unless you're using something like Authelia to manage authentication. |
| DATABASE_URL | If you want to have Yacht use a database like SQL instead of the built in sqlite on you can put that info here in the following format: postgresql://user:password@postgresserver/db |
| COMPOSE_DIR | This is the path inside the container which contains your folders that have docker compose projects. (compose tag only) |