Promox VE
Proxmox VE is an open-source server management platform for your enterprise virtualization. It tightly integrates KVM hypervisor and LXC, software-defined storage, and networking functionality on a single platform. With the integrated web-based user interface you can easily manage VMs and containers, highly available clusters, or the integrated disaster recovery tools with ease.
- HumHub
- Install and Setup Proxmox VE
- Access Proxmox Server Remotely - Virtual Console not Loading
- Setup and Install Docker in a Promox LXC Conainer
- Setup and Install Docker in a Promox 7 LXC Conainer
- Add External USB Storage to Proxmox
- Enable Proxmox TFA Two Factor Authentication
- How to list VMs and Containers in Proxmox
HumHub
HumHub Install with Turnkey LAMP on Proxmox
HumHub is a free and open-source social network software written on top of the Yii PHP framework that provides an easy to use toolkit for creating and launching your own social network.

Install the Turnkey LAMP in a new LXC:
- Click on your preferred storage on the left side of Proxmox
- Click on CT Templates then Templates
- Search for Turnkey LAMP and download
Launch a new CT with the Turnkey LAMP template and install. Once finished, log in as root and password.
Run apt update
Download HumHub
Extract the files
Use WinSCP (from Windows remotely) or terminal locally to access the directory var/www with the root LXC credentials.
Drop the HumHub files into the www directory

When files are done uploading give write access to the assets folder using CHMOD.
Run the following command in the terminal of the LXC to update PHP and install plugins. I tried running HumHub on php 7.3 and ran into a slew of issues when trying to run the cronjobs. PHP version 8 seems to do the job.
apt update
apt install -y php8.0-{mysql,cli,common,snmp,ldap,curl,mbstring,zip} -y- Adminer; login as MySQL username adminer: password: your LXC root pass
https://12.34.56.789:12322 - Adminer database management web app
- Create the HumHub database and a new user with full privileges
File permissions
At least following directories and files needs to be writable by the PHP process:
/assets/protected/config//protected/modules/protected/runtime/uploads/*
chown -R www-data:www-data /var/www/humhub
If you want to use the HumHub automatic updater, all files must be writable.
If you see any missing PHP plugins, just google for them and it's pretty basic. Just tedious and takes time but you should be good to go other than a couple image plugins that you most likely wont need.
Enter your database connection info using localhost as the db host. I had to create a new user and give it privileges in Adminer to get it to work but it only takes a few seconds.
Be sure to make a snapshot or backup in Proxmox right after the initial setup and admin account is created. This way if you break something, you can just roll back to a fresh start.
Extra:
You may want to up the max image/video size from 8M. You can do this by going to /etc/php/8.0 then edit the php.ini values. PHP version may be different when you install but that will be where the php.ini file is stored. Change the below values by using WinSCP (on a Windows machine), open the file and hit CTRL F to find them. You can use vim or nano in your terminal to edit the file just as easy. Whatever you prefer.
upload_max_filesize = 200M
post_max_size = 200M
Be sure to save the php.ini and exit. If you upload larger videos, be sure to make the sizes larger to accommodate that.
Cron Jobs
Asynchronous jobs in HumHub are used to run potentially heavy or scheduled tasks such as sending out summary mails, notifications or search index optimization. If not setup, you will see a warning message on your site. It won't effect your posting but without setting them up, your posts will not be indexed and searchable.

php /var/www/protected/yii cron/runphp /var/www/protected/yii queue/runAdd the above commands to crontab.
You can run the commands manually once to clear the warning message off your site.
crontab -eScroll to the bottom and add the following commands.
0 * * * * php /var/www/protected/yii cron/run
*/10 * * * * php /var/www/protected/yii queue/run
This means if you add something to your site right after the cronjobs run, you will have to wait 10 minutes before they will show up in search results.
Save and exit.
Did you find this helpful? Subscribe to me on Youtube for more content!
Install and Setup Proxmox VE
This guide will explain how to install Proxmox VE on a bare metal system. You don't need a fancy server to run Proxmox.
Recommended Hardware
- Intel EMT64 or AMD64 with Intel VT/AMD-V CPU flag.
- Memory, minimum 2 GB for OS and Proxmox VE services. Plus designated memory for guests. For Ceph or ZFS additional memory is required, approximately 1 GB memory for every TB used storage.
- Fast and redundant storage, best results with SSD disks.
- OS storage: Hardware RAID with batteries protected write cache (“BBU”) or non-RAID with ZFS and SSD cache.
- VM storage: For local storage use a hardware RAID with battery backed write cache (BBU) or non-RAID for ZFS. Neither ZFS nor Ceph are compatible with a hardware RAID controller. Shared and distributed storage is also possible.
- Redundant Gbit NICs, additional NICs depending on the preferred storage technology and cluster setup – 10 Gbit and higher is also supported.
- For PCI(e) passthrough a CPU with VT-d/AMD-d CPU flag is needed.
Here, you can see more on Proxmox hardware requirements.
Install Proxmox VE
An album with all of the following screenshots can be found here: https://imgur.com/a/lSg9Lzt
- The first step to installing Proxmox is downloading the installation ISO (https://i.imgur.com/76OXSL2) from their website (https://www.proxmox.com/en/downloads), and make a bootable USB stick out of it. For this tutorial, we assume you know how to do this.
- Make sure virtualization support is turned on in the BIOS of the server. The Intel version of this is called VT-d or VT-x. The AMD version is called AMD-V. If your server for some reason does not support this, you can unfortunately not make use of the full power of Proxmox. Unfortunately, this is probably the hardest part of the tutorial. Turning virtualization support on will be different on every server/motherboard thus making it very difficult for us to show how this is done. Usually this option is turned on by default, but it is a good idea to check this. You can google “[motherboard name] virtualization bios” to see how to do this for your specific motherboard.
- Insert the earlier created bootable USB drive into the server and boot from it. You should see this (https://imgur.com/tHEP7u8) screen.
- Now press [Enter] on “Install Proxmox VE”. After a few seconds you should see a screen with the user licence agreement (https://imgur.com/B02f7a3). After reading the User Licence Agreement, press “I agree”.
- Now select the physical disk you want to install Proxmox on next to “Target-Harddisk”. We recommend NOT installing Proxmox on a USB device. Unlike some hypervisor operating systems you may have heard of, Proxmox does not run from memory. This means that if you install Proxmox on a USB drive, it will cause a lot of wear, and your USB drive might fail sooner than expected[3]. Press “Next” after selecting the right hard drive. (https://imgur.com/cNC3S9U)
- Enter your Country, Time zone and Keyboard Layout accordingly. Press “Next”. (https://imgur.com/UI5lyoN)
- Enter a password for your root account with a valid email address. This email address will be used by Proxmox for important notifications. Press “Next”. (https://imgur.com/tmJmwJa)
- Enter your preferred network settings. Proxmox should automatically detect these settings, so you can press “next” without changing anything, and it should work fine. (https://imgur.com/vyjH51z). For now, we will not make any changes to these settings.
- The next step of the installation will be a summary of your settings. Make sure they are all ok and then press install. ProxMox will now install itself on the selected hard drive (https://imgur.com/0g3BDLr).
- The last screen of the installation should say that it was a success. Press “Reboot”. (https://imgur.com/h1TIMXo)
- After the system reboots, you will see a blue screen with several startup options. Do not press any button. Proxmox will continue to boot normally after a few seconds. (https://imgur.com/Vy5O8oe)
- The next screen should be a console showing the IP address chosen during the installation of Proxmox. To access the Proxmox UI, use a browser on a different computer on the same network to navigate to the IP Address and the specified port as shown on the Proxmox server. Make sure to use “https” as well. (https://imgur.com/G8TzBkf)
- Once you access the Proxmox UI on another computer in the same network you will be greeted with a login screen (https://imgur.com/5zFcC0I). Log in with the username “root” and the password you chose during the installation. Congratulations, your Proxmox install is now complete and working.
This guide was sited from the Proxmox forum.
Access Proxmox Server Remotely - Virtual Console not Loading
So you have Nginx Proxy Manager setup to remotely access your Proxmox server. Everything is working fine accept your virtual console? This is a common issue and I have an easy fix!
Step 1: Edit the Proxy Host

Turn on the switch for "Websockets Support" then save it.
Step 2: Done.
As always, PLEASE exercise caution when exposing this over the internet. At the very least, enable Proxmox TFA and add another layer of security to your Proxmox host.
Check out my Youtube channel for self hosting related content!
Setup and Install Docker in a Promox LXC Conainer
This guide is for Proxmox VE 6.4.4 or earlier and will NOT work well on version 7. See this guide for 7.
You should check out my website at noted.lol!
Containers are a lightweight alternative to fully virtualized machines (VMs). They use the kernel of the host system that they run on, instead of emulating a full operating system (OS). This means that containers can access resources on the host system directly.
The runtime costs for containers is low, usually negligible. However, there are some drawbacks that need be considered:
-
Only Linux distributions can be run in Proxmox Containers. It is not possible to run other operating systems like, for example, FreeBSD or Microsoft Windows inside a container.
-
For security reasons, access to host resources needs to be restricted. Therefore, containers run in their own separate namespaces. Additionally some syscalls (user space requests to the Linux kernel) are not allowed within containers.
Proxmox VE uses Linux Containers (LXC) as its underlying container technology. The “Proxmox Container Toolkit” (pct) simplifies the usage and management of LXC, by providing an interface that abstracts complex tasks.
Containers are tightly integrated with Proxmox VE. This means that they are aware of the cluster setup, and they can use the same network and storage resources as virtual machines. You can also use the Proxmox VE firewall, or manage containers using the HA framework.
Our primary goal is to offer an environment that provides the benefits of using a VM, but without the additional overhead. This means that Proxmox Containers can be categorized as “System Containers”, rather than “Application Containers”.
The above was sited from the Proxmox VE website.
Download the Turnkey Core template
To setup and install Docker in a Proxmox LXC Conainer, you will have to download the Turnkey Core template to your storage.
1. Click on your storage then click on the templates button.

2. Search for the core template and click download.

3. When it's done you can click the "Create CT" button in the upper right corner.

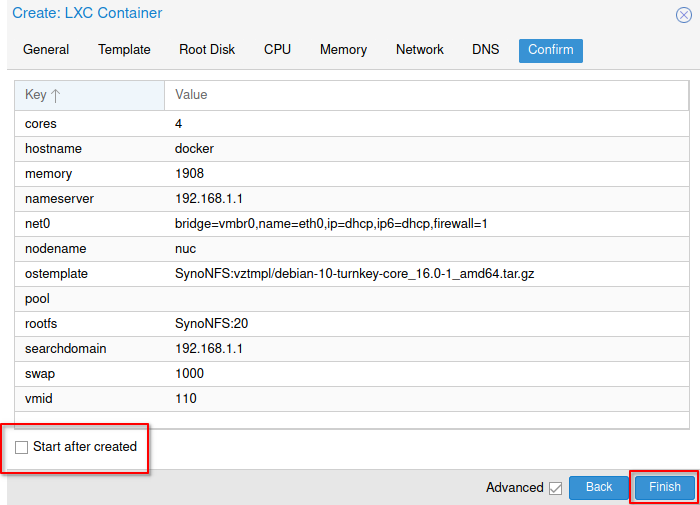
4. Set your hostname and password and be sure to UNCHECK "Unprivileged container" or this will not work. Now move on to the Template tab.

5. Select the storage where you downloaded the Turnkey Core template then choose the template.

6. In the Storage tab choose where you want the container to use storage. For the disk size I recommend at-least 20gb of space. This depends on what you plan on doing with the container. For example if you plan on downloading a bunch of files, you may want a larger size disk.

7. On the CPU tab, I usually put 4 cores but this is overkill for a container. This depends on the processor you have in your system.

8. On the Memory tab I usually allocate 2gb for containers.

9. On the Network tab I let the DHCP host assign the IP automatically.

10. On the DNS tab I just use my gateway IP.

11. Confirm your settings and make sure you DO NOT tick "Start after created". Click finish and let the container create.
12. Once done, you will see "TASK OK". Click the X in the upper corner and proceed to the next step.

13. Select the container and then click on Options then double click on Features.

14. Tick Nesting then click ok.

15. Now you can start your container and view the console.

This will start the container and run the install script then assign an IP to your container. Once done you will need to login using root and the password you chose when you created the container in step 4.

16. Now we have to go through the Turnkey setup. Skip the API entry.
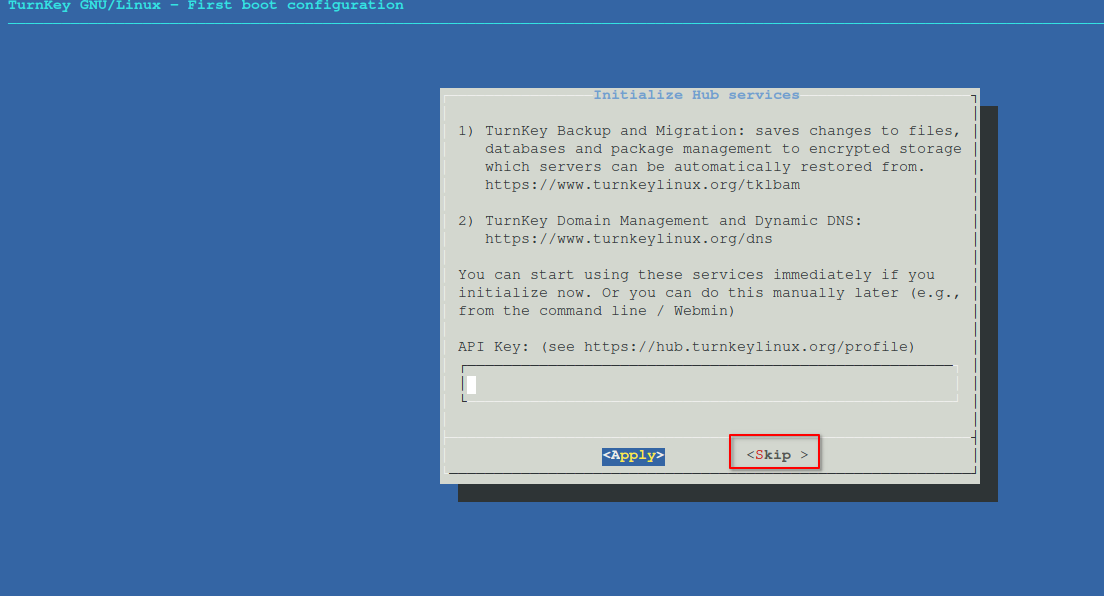
17. Skip the notifications.

18. Install security updates.

This will take you to the final screen and will show you what the access IP and ports are for the appliance services. It's important to make a note of these incase you need them for future use.

19. Press CTRL+C to clear the console and now you can update the system by typing the commands below. Since we only use root in Proxmox, you do not need to use sudo for any commands through the console.
apt-get updatethen
apt-get upgradeInstall Docker on your Promox Container
Run the following commands one at a time.
apt install docker.iosystemctl enable dockersystemctl start dockerNow make sure Docker is running
systemctl status dockerInstall Portainer
This is completely optional but I wanted to add this in here just in-case you wanted a Docker UI. Run the following command to install Portainer 2.0
docker run -d \
--name="portainer" \
--restart on-failure \
-p 9000:9000 \
-v /var/run/docker.sock:/var/run/docker.sock \
-v portainer_data:/data \
portainer/portainer-ce
Once completed, visit the IP of your container and port 9000. Example: 192.168.1.168:9000.
If you forgot the IP of your container, open the console and type
ip addrPress enter and find your container IP. It's usually towards the top.
Did you find this helpful? Subscribe to me on Youtube for more content!
Setup and Install Docker in a Promox 7 LXC Conainer

You should check out my website at noted.lol!
Follow these steps to install docker in Proxmox 7 LXC.
Install Docker via Script (recommended)
This script is the official Docker installer maintained by Docker Inc.
curl -fsSL https://get.docker.com -o get-docker.sh
sh get-docker.sh
Install Docker Manually
Update the apt package index and install packages to allow apt to use a repository over HTTPS:
apt-get updateapt-get install \
apt-transport-https \
ca-certificates \
curl \
gnupg \
lsb-releaseAdd Docker’s official GPG key:
curl -fsSL https://download.docker.com/linux/debian/gpg | gpg --dearmor -o /usr/share/keyrings/docker-archive-keyring.gpgUse the following command to set up the stable repository. To add the nightly or test repository, add the word nightly or test (or both) after the word stable in the commands below. Learn about nightly and test channels.
echo \
  "deb [arch=amd64 signed-by=/usr/share/keyrings/docker-archive-keyring.gpg] https://download.docker.com/linux/debian \
  $(lsb_release -cs) stable" | tee /etc/apt/sources.list.d/docker.list > /dev/null
Update the apt package index, and install the latest version of Docker Engine and containerd.
apt-get updateapt-get install docker-ce docker-ce-cli containerd.ioVerify docker is running on the system
systemctl status dockerAdd External USB Storage to Proxmox
To use storage from an attached USB drive, we need to enter the Proxmox shell command line interface. There's just a few quick things we need to do, then you can enjoy your new external storage on Proxmox!
Connect the USB Drive
Make sure the USB drive is connected and ready to go. It's best that the drive is new and not used with files already on it. Also, once you plug it in to a USB port, you cannot change the port after we mount it. This is very important. So make sure you have it plugged into the right USB port.
If you need to clear the drive you can do so using cfdisk.
cfdisk /dev/sdbMake sure you change the drive accordingly to your own ID above. See below for how to find this information.
Figure out what drive it is
Find the drive device ID running this command
fdisk -l
Here we can see my 4TB USB drive. I had to scroll up pretty far in the terminal to find it. Here you can see the ID is sdb1.
Create the filesystem
If we tried mounting the drive without setting the filesystem, we would get an error like this
wrong fs type, bad option, bad superblock on /dev/sdb1, missing codepage or helper program, or other error.
So to avoid this, we need to run the following command
mkfs.ext4 /dev/sdb1Make sure you change this to the correct device ID that matched your own drive.
Create folder for mounting
Now we have to make a folder where the drive will be mounted. I used the following folder.
mkdir /mnt/USB_DataNow we mount the drive to it
mount /dev/sdb1 /mnt/USB_DataAdd the drive in Proxmox UI
Now we go into Proxmox and add storage as a Directory using our new USB drive

Give it a name (any name should work). The Directory MUST be the folder where the new drive was mounted. Click add.

You should now see your new drive and it should be ready to use.

You most likely want the USB drive to automatically mount when you reboot or unplug and plug them back in. To accomplish this we need to run the following in the PVE shell.
apt-key adv --recv-keys --keyserver keyserver.ubuntu.com 2FAB19E7CCB7F415
echo "deb https://apt.iteas.at/iteas buster main" > /etc/apt/sources.list.d/iteas.list
apt update
apt install pve6-usb-automount
Did you find this helpful? Subscribe to me on Youtube for more content!
Enable Proxmox TFA Two Factor Authentication
There just might be a time when you want to do more with your Proxmox host and expose it to the internet so you can access it remotely. Or so you just don't have to remember the IP. Either way, adding another layer of security is a must. Especially if it's already baked into Proxmox. Why not use it? Enable TFA on Proxmox!
Step 1:
In the upper right corner click on "root@pam".

Step 2:
Click "TFA"

Step 3:
Click on "Randomize" a few times then open your favorite Authentication app. I use an app called Authy. It's free and works great! You should be able to use any authentication app. Scan the QR code to add your Proxmox host to your authenticator app.


Step 4:
Grab the code and plug it in on Proxmox where it says "Verification code"
Step 5:
Click "Apply".
Check out my Youtube channel for self hosting related content!
How to list VMs and Containers in Proxmox
To get the list of virtual machines and containers you have on your proxmox node, run the following commands.
To list containers run this command in shell
pct listTo list VMs, run this command in shell
qm list