
Setup and Install Docker in a Promox LXC Conainer
This guide is for Proxmox VE 6.4.4 or earlier and will NOT work well on version 7. See this guide for 7.
Containers are a lightweight alternative to fully virtualized machines (VMs). They use the kernel of the host system that they run on, instead of emulating a full operating system (OS). This means that containers can access resources on the host system directly.
The runtime costs for containers is low, usually negligible. However, there are some drawbacks that need be considered:
-
Only Linux distributions can be run in Proxmox Containers. It is not possible to run other operating systems like, for example, FreeBSD or Microsoft Windows inside a container.
-
For security reasons, access to host resources needs to be restricted. Therefore, containers run in their own separate namespaces. Additionally some syscalls (user space requests to the Linux kernel) are not allowed within containers.
Proxmox VE uses Linux Containers (LXC) as its underlying container technology. The “Proxmox Container Toolkit” (pct) simplifies the usage and management of LXC, by providing an interface that abstracts complex tasks.
Containers are tightly integrated with Proxmox VE. This means that they are aware of the cluster setup, and they can use the same network and storage resources as virtual machines. You can also use the Proxmox VE firewall, or manage containers using the HA framework.
Our primary goal is to offer an environment that provides the benefits of using a VM, but without the additional overhead. This means that Proxmox Containers can be categorized as “System Containers”, rather than “Application Containers”.
The above was sited from the Proxmox VE website.
Download the Turnkey Core template
To setup and install Docker in a Proxmox LXC Conainer, you will have to download the Turnkey Core template to your storage.
1. Click on your storage then click on the templates button.

2. Search for the core template and click download.

3. When it's done you can click the "Create CT" button in the upper right corner.

4. Set your hostname and password and be sure to UNCHECK "Unprivileged container" or this will not work. Now move on to the Template tab.

5. Select the storage where you downloaded the Turnkey Core template then choose the template.

6. In the Storage tab choose where you want the container to use storage. For the disk size I recommend at-least 20gb of space. This depends on what you plan on doing with the container. For example if you plan on downloading a bunch of files, you may want a larger size disk.

7. On the CPU tab, I usually put 4 cores but this is overkill for a container. This depends on the processor you have in your system.

8. On the Memory tab I usually allocate 2gb for containers.

9. On the Network tab I let the DHCP host assign the IP automatically.

10. On the DNS tab I just use my gateway IP.

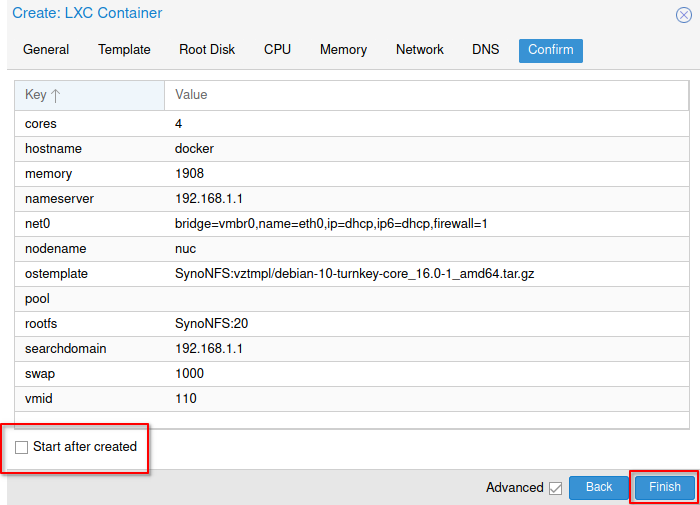
11. Confirm your settings and make sure you DO NOT tick "Start after created". Click finish and let the container create.
12. Once done, you will see "TASK OK". Click the X in the upper corner and proceed to the next step.

13. Select the container and then click on Options then double click on Features.

14. Tick Nesting then click ok.

15. Now you can start your container and view the console.

This will start the container and run the install script then assign an IP to your container. Once done you will need to login using root and the password you chose when you created the container in step 4.

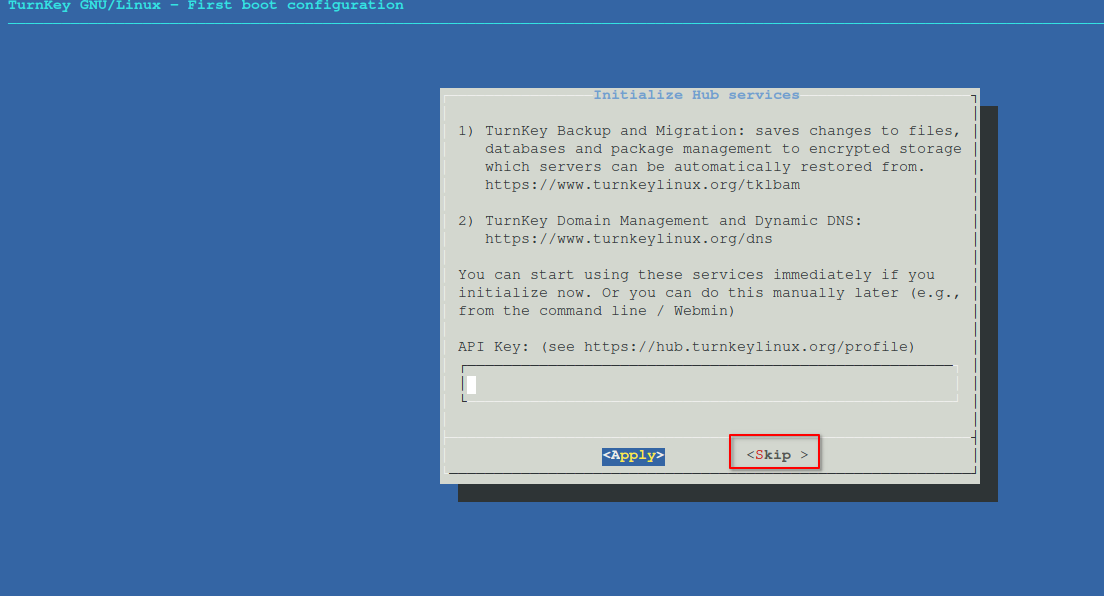
16. Now we have to go through the Turnkey setup. Skip the API entry.
17. Skip the notifications.

18. Install security updates.

This will take you to the final screen and will show you what the access IP and ports are for the appliance services. It's important to make a note of these incase you need them for future use.

19. Press CTRL+C to clear the console and now you can update the system by typing the commands below. Since we only use root in Proxmox, you do not need to use sudo for any commands through the console.
apt-get updatethen
apt-get upgradeInstall Docker on your Promox Container
Run the following commands one at a time.
apt install docker.iosystemctl enable dockersystemctl start dockerNow make sure Docker is running
systemctl status dockerInstall Portainer
This is completely optional but I wanted to add this in here just in-case you wanted a Docker UI. Run the following command to install Portainer 2.0
docker run -d \
--name="portainer" \
--restart on-failure \
-p 9000:9000 \
-v /var/run/docker.sock:/var/run/docker.sock \
-v portainer_data:/data \
portainer/portainer-ce
Once completed, visit the IP of your container and port 9000. Example: 192.168.1.168:9000.
If you forgot the IP of your container, open the console and type
ip addrPress enter and find your container IP. It's usually towards the top.
Did you find this helpful? Subscribe to me on Youtube for more content!